
Saturday, 13 April 2013
Nemesis
How close behind us does Nemesis dog our footsteps?
Doesn't everyone have a cat-destroys-lovingly-painted-and-constructed-miniatures story? This was fortunately only a close call, but I shall be securing my display area more carefully from now on.
Thursday, 11 April 2013
Mass painting
I know "green horde" tactics can be unpopular: both with ork players- because of the painting time, and with those you play against - because it can slow a game down moving so many miniatures. But really horde-ing is what the orks are all about. If not for tournament play, then in the fluff and for theme games. And I am overwhelmingly a fluffy player, loving campaigns and narratives.(TL;DR? Scroll down for photos)
So, my plan is to have access to a horde, if not play it every time. And as I am poor, I have to look down some cost saving routes. Perhaps the best is route is always ebay, but what that means is you will usually have someone else's painting to deal with. Sometimes it will be very nice, but perhaps a wrong fit. Some of my pieces have come from a bad moon player, and I can't be mixing and matching that bright yellow with my white and brown boyz. Other times they will be unfinished, or just base coated, which is lovely. Worst of all are those moments you unpack the parcel and cannot help but utter the immortal line "dude, do you even thin?"
In all instances, the more paint you can get off, the better. Fairy power spray is my weapon of choice as it is cheap if used sensibly and doesn't damage the plastic. With metal miniatures it is even better as I can rock out a brush attachment on the Dremel and the layers of paint are often whipped off in the manner of a conjurer pulling a table clothe out from under your dinner. But the Dremel is not your friend with plastic, so you have to go back to the trusty toothbrush.
My batch of over 100 ork boys were all sorts, from some I'd used to test out themes before settling on what I'd use for my army, to some in just virgin plastic, to a nice batch I recently got which were mostly just undercoated or very thinly painted. All needed cleaning - even the virgin plastic as these days they come with mold grease still on them that rejects paint like a baby who does not want to say ahh for the aeroplane. This was a very tedious afternoon's work.
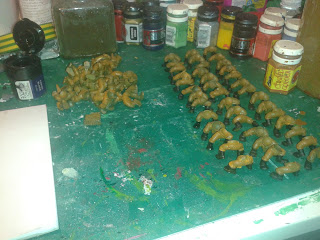
Next, was base colouring with the air brush. Now I hatched a plan, as the general areas of colour fall roughly in line with the seperate parts of the ork boy kits. So heads and arms could be based in green, torsos in cream, and legs in brown, all the other colours are darker so would go over these base colours pretty well.
Here is my torsos laid out ready to spray. Also some boys that are from the kit where the legs are not separate.
.jpg)
Looking oddly like the photo is in negative, but that is an unaltered photo.
Airbrushing, I ran the risk of clogging to simply water down my regular paints by about 4-1 water to paint. Really thin, but 4 coats, rotating by 90 degrees per coat seemed to be pretty good coverage to me. Alas clogging was a big factor. I have since been told that there are some nice acrylic mediums for airbrushing that can solve this. When I've looked into it I'll no doubt blog about them.

In all, the airbrushing took the best part of a day for just 3 colours. The worst was the arms, which I had to do in batches as there were so many,the green was the most truculent colour to get a good finish with. I had to QC all the parts after each batch and feed back the sub par ones into the next batch.

Once everything was sprayed, it was then blocking in the other colours on each part. Here are the legs in progress.
The miniatures could be glued at various stages, once everything that might be obscured by a part was done. Here are bodies on the legs.


And then heads once the necks had been blocked in in green.

 After this, they are ready to be inked, highlighted and detailed. I have chosen to do these stages in batched of 10.
Inked and completed
 And finally detailed and then based


Will post up a full collection post when I've got a few more batches done.
In terms of time taken. I Started cleaning 12 days ago. My normal rate is about 3 minis a day, So actually I could have got 36 done by now. But doing a batch of 10 a day from now on, I should be finished in 11 days from now, when it would have taken me maybe 40 days, so definitely worth doing this way.
So, my plan is to have access to a horde, if not play it every time. And as I am poor, I have to look down some cost saving routes. Perhaps the best is route is always ebay, but what that means is you will usually have someone else's painting to deal with. Sometimes it will be very nice, but perhaps a wrong fit. Some of my pieces have come from a bad moon player, and I can't be mixing and matching that bright yellow with my white and brown boyz. Other times they will be unfinished, or just base coated, which is lovely. Worst of all are those moments you unpack the parcel and cannot help but utter the immortal line "dude, do you even thin?"
In all instances, the more paint you can get off, the better. Fairy power spray is my weapon of choice as it is cheap if used sensibly and doesn't damage the plastic. With metal miniatures it is even better as I can rock out a brush attachment on the Dremel and the layers of paint are often whipped off in the manner of a conjurer pulling a table clothe out from under your dinner. But the Dremel is not your friend with plastic, so you have to go back to the trusty toothbrush.
My batch of over 100 ork boys were all sorts, from some I'd used to test out themes before settling on what I'd use for my army, to some in just virgin plastic, to a nice batch I recently got which were mostly just undercoated or very thinly painted. All needed cleaning - even the virgin plastic as these days they come with mold grease still on them that rejects paint like a baby who does not want to say ahh for the aeroplane. This was a very tedious afternoon's work.
Next, was base colouring with the air brush. Now I hatched a plan, as the general areas of colour fall roughly in line with the seperate parts of the ork boy kits. So heads and arms could be based in green, torsos in cream, and legs in brown, all the other colours are darker so would go over these base colours pretty well.
Here is my torsos laid out ready to spray. Also some boys that are from the kit where the legs are not separate.
.jpg)
Looking oddly like the photo is in negative, but that is an unaltered photo.
Airbrushing, I ran the risk of clogging to simply water down my regular paints by about 4-1 water to paint. Really thin, but 4 coats, rotating by 90 degrees per coat seemed to be pretty good coverage to me. Alas clogging was a big factor. I have since been told that there are some nice acrylic mediums for airbrushing that can solve this. When I've looked into it I'll no doubt blog about them.

In all, the airbrushing took the best part of a day for just 3 colours. The worst was the arms, which I had to do in batches as there were so many,the green was the most truculent colour to get a good finish with. I had to QC all the parts after each batch and feed back the sub par ones into the next batch.

Once everything was sprayed, it was then blocking in the other colours on each part. Here are the legs in progress.

The miniatures could be glued at various stages, once everything that might be obscured by a part was done. Here are bodies on the legs.


And then heads once the necks had been blocked in in green.


Inked and completed


Will post up a full collection post when I've got a few more batches done.
In terms of time taken. I Started cleaning 12 days ago. My normal rate is about 3 minis a day, So actually I could have got 36 done by now. But doing a batch of 10 a day from now on, I should be finished in 11 days from now, when it would have taken me maybe 40 days, so definitely worth doing this way.
Thursday, 4 April 2013
Procrastination
Its not exactly unconstructive as they all need painting. But sometimes one's planned painting schedule goes up in smoke because another miniature is watching you with pleading in its beady little eyes.
The ork boys are in there seperate parts.Arms and heads to be airbrushed green, bodies bleached bone, and trousers snakebite leather (yes, my paint set it that old!).All stripped and washed and ready for their basecoat, and suddenly I'm painting these two special weapon boyz! Its a good thing I love them!
 Just a note on my photography: This one is sub par as I did it with my phone. Usually My lovely lady gives my minis the full photoshoot experience with her excellent camera.
The ork boys are in there seperate parts.Arms and heads to be airbrushed green, bodies bleached bone, and trousers snakebite leather (yes, my paint set it that old!).All stripped and washed and ready for their basecoat, and suddenly I'm painting these two special weapon boyz! Its a good thing I love them!
Monday, 1 April 2013
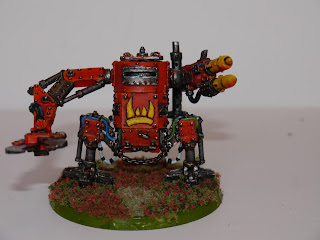
Deff Dread Done!
Almost exactly a week's work.

First BIG miniature of my project. I got him on a trip up to Nottingham and GW's headquarters and Warhammer World - well worth the trip I might add.

 After that, I had to break the miniature down into areas. Trying to do all of the red in one go, for example, would have been a near Sisyphean task. Demoralizing, but also tricky to mix the shades in the right volumes and keep them wet while I worked,so instead I just did a limb at a time,completing all the defining and detail before moving on to the next.


First BIG miniature of my project. I got him on a trip up to Nottingham and GW's headquarters and Warhammer World - well worth the trip I might add.

Working on a model this size has its own complications. Such large amounts of paint need a slightly different approach. I've not had much experience with the airbrush, but got my first go for this model. Basically undercoated with Blood Angel Red - lots of thin coats to get a smooth finish, and the all the metal areas got a thin base of chaos black.


Nice as it gives some immediate gratification. I was pleased with the first arm, and was able to look at it for reference and a boost to the morale as I progressed through the miniature.
I'm told my basing is quite archaic, but I like old school. With my dear lady's connection to her family's craft shop, I was able to source some very posh "Flowersoft". I hope soon to start constructing a gaming table for the home in a similar vein. Something jungly and orky that matches the bases.
Next Project: I accidentally bought nearly 100 ork boys in a job lot on ebay. Was a bargain so couldn't say no. Have just been breaking them into their parts so I can see about using the airbrush much more. Details to follow.
Sunday, 31 March 2013
Resurrecting brushes
Once upon a time I got through so many brushes! I'd be buying about 3 a week in peak painting times. Acrylic is just a killer of brushes: it works up the bristles and dries in there forcing them apart. Metalics are even worse.
Bearing in mind you need all your disposable income to spend on your plastic crack, this was a serious drag.
In steps my lady. Hero of the scrapbook. Scion of the craft shop owner. Brainbox of ink and paper.
Her technique for resurrecting brushes is the business.
Obviously the best thing is to clean them regularly, but if you are on a big project, the paint is drying in there as you paint. I'm on a Deff Dread right now and I might be using one colour for 30 minutes.
Washing up liquid at the end of every session of painting is also good. Even if the paint is dry, its not totally dry,and the washing up liquid breaks up nearly all of it. But eventually your brush will succumb to that "bad hair day" look, at which point I used to bin them. But my Kate showed me the true path: boiling water.
It sounds brutal but it works. When the brush will no longer hold a point, clean it first as best you can with the washing up liquid, but then boil the kettle and rinse the brush out with freshly boiling water. Then shape it back to a point and let it dry and it is very nearly good as new.
Style
My friend Henry got chatting to me today. He's nearly exactly 10 years younger than me, and is very much a different generation of Warhammerer. He's got a lovely painting style, nice tone, and a really delicate technique. Its all about the airbrush and the top notch inks. His comments about my technique often revolve around "you have a lot of patience". But truth be told, I'm a bit of a dinosaur.
It seems a lot has happened in my 15 years away from the hobby. The new miniatures are so good, perhaps almost good enough to justify the price! And a lot of ideas have clearly bounced around the internet, something we didn't have back in the day. Back when I last played, my painting tips were gleaned from the pages of White Dwarf and my local hobby store - the sadly now defunct Fun Fact and Fantasy. I'd never heard of airbrushing being used on miniatures, and heat guns to dry the paint? Where have you been all my life?
It seems my style of painting is very much upside down to the current vogue. I do my nice clean base coat of colour - several very thin coats to get a really smooth finish - and then get nice and dark with an appropriate ink. From there its about bringing the tone up to a high contrast, I lazily call it highlighting, but its more accurate to call it Defining. I don't really think about a light source, I'm trying to define the shapes with a view to making an illusion with the scale - trying to make a small miniature look big. The result is quite cartoonish I think.

My love for Grotz
I'm all about the grots. I will have to get cracking with more. Ammo Runtz, Painboy Orderlies. Some Big Gunz will have to happen soon. I really like sculpting them as they are pretty quick and easy. For me orks without Grotz are just lame, and Ork world should be swarming with them.
For £10, a pack of Grotz is a nice little pick me up. I live 30 seconds walk from my nearest stockist, and I just love painting them. In game terms, they may have their limitations, but you just have to have them really.

For £10, a pack of Grotz is a nice little pick me up. I live 30 seconds walk from my nearest stockist, and I just love painting them. In game terms, they may have their limitations, but you just have to have them really.

Subscribe to:
Posts (Atom)